How to Dethatch a Lawn: The Ultimate Guide to Reviving Your Grass

A lawn can look weak even when you water and mow on schedule. One common reason is thatch. Thatch is a layer of dead stems and roots that sits between the green grass and the soil. When it gets too thick, it can block water and air, making your lawn feel spongy. That’s when it helps to know how to dethatch a lawn the right way.
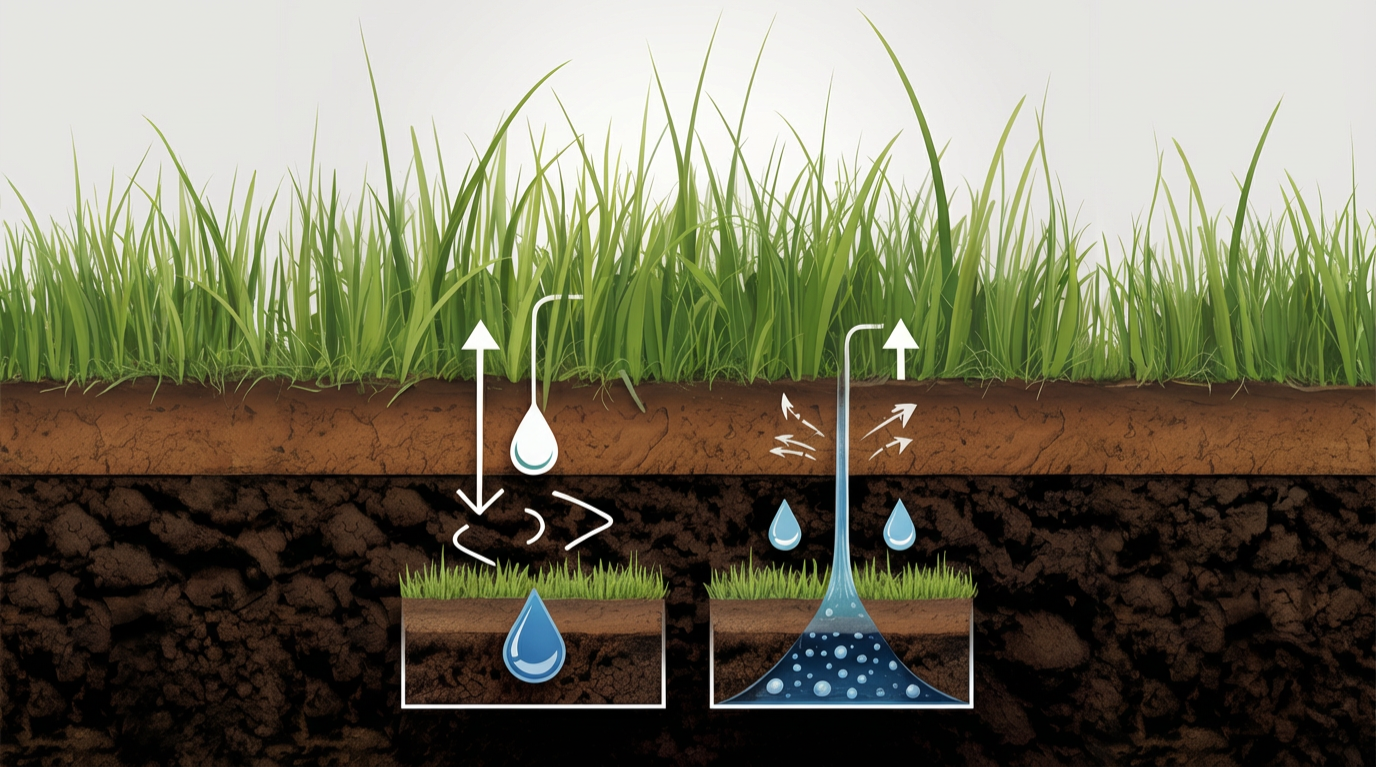
Thick thatch can reduce the effectiveness of watering. Water may run off rather than soak in. Grass may also root into the thatch instead of the soil, which makes it dry out faster and struggle in hot weather.
Keep reading for the exact signs to look for, the best timing for your grass type, the right tools to use, and the post-dethatching watering routine that helps your lawn recover fast.
What is Dethatching a Lawn?
What is dethatching a lawn? It’s removing excess thatch—the tan-to-brown, stringy layer that forms between the green grass blades and the soil surface.
Thatch is composed mostly of tougher, slower-to-degrade plant parts, such as stems, runners, and roots. It’s different from normal grass clippings, which usually break down quickly when you mow regularly.
A little thatch isn’t automatically bad. In a thin layer, it can cushion foot traffic and help buffer quick moisture changes. The trouble starts when it turns into a dense mat.
The “1/2 inch rule” (when thatch becomes a problem)
A practical homeowner threshold is about 1/2 inch. When the thatch layer is thicker than that, it’s more likely to interfere with water movement, reduce airflow into the soil, and cause weak, shallow rooting.
The goal of lawn dethatching is not to scrape everything down to bare dirt. The goal is to remove thatch until the remaining layer is thin enough for water and air to move through, and for roots to anchor in soil rather than living in the thatch.
Why does thick thatch mess with watering + roots
Thick thatch can make watering unpredictable. Water may run off instead of soaking in, or it may wet the thatch layer unevenly and never fully recharge the soil underneath.
Roots can also start growing into the thatch instead of deeper into the soil. Those roots dry out faster and struggle more in heat, which is why lawns with heavy thatch often look drought-stressed even when you water.
Signs Your Lawn Needs Dethatching
A thatch problem usually shows up as a lawn that looks “off” even when your mowing and watering are decent. The giveaway is that the turf starts acting like it’s sitting on a pad instead of rooted into the soil.
The “spongy walk” test + visual clues
When you walk across the lawn, it may feel springy or cushioned, almost like a worn-out welcome mat. That spongy feel is often the thatch layer compressing under your feet.
You may also notice watering doesn’t behave normally. Water can puddle or run off, or the surface may stay damp while the lawn still looks dry and stressed a day later.
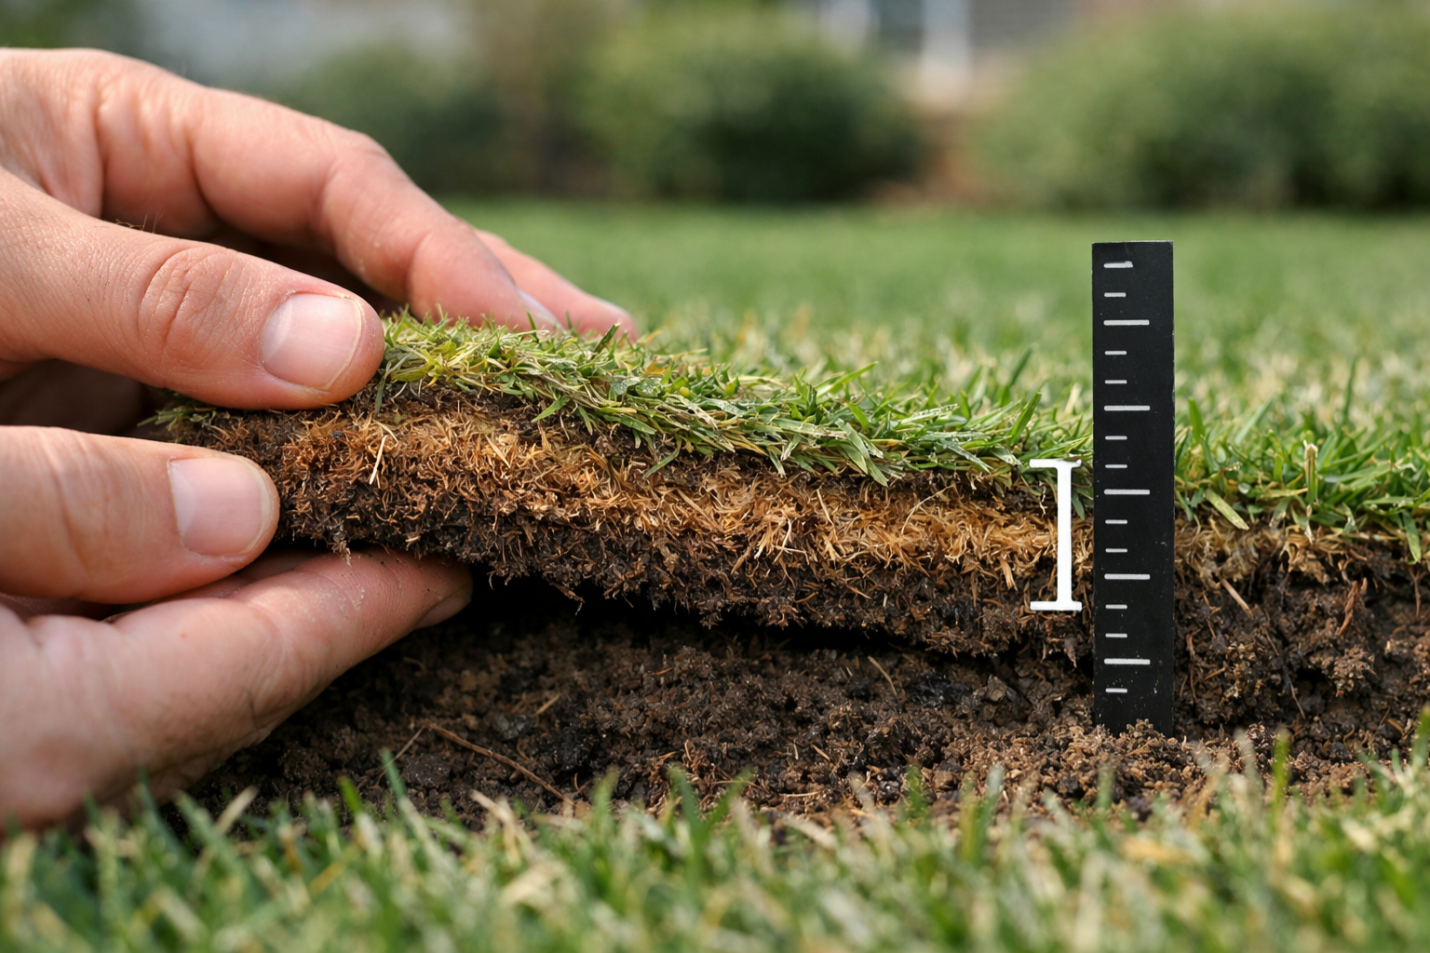
A quick visual check helps, too. Part the grass down to the soil. If you see a matted, brown, fibrous layer between the green blades and the dirt, that’s thatch—not bare soil.
Quick measurement method (cut wedge, measure layer)
The most reliable way to confirm is to cut a small wedge of turf (a “slice” you can lift like a flap) with a hand trowel or soil knife. Look at the side profile.
You’re measuring the brown, springy layer between the green grass and the soil. When that thatch layer is more than about 1/2 inch, dethatching becomes a smart next step.
When to Dethatch a Lawn (Timing is Critical)
Dethatching is stressful on turf. The safest time is when your grass is actively growing and can heal fast. For most lawns, that means mild weather and steady moisture—not heat, drought, or dormancy.
Cool-season vs warm-season rule of thumb
Cool-season grasses bounce back best in late summer into early fall, when temperatures cool down but the lawn is still in a strong growth phase. Spring can work for lighter jobs, but fall is usually the cleaner recovery window.
Warm-season grasses should be dethatched in spring after green-up through early summer, when the lawn is growing aggressively. Doing it too early while it’s still waking up, or too late when it’s stressed by peak heat, slows recovery and can thin the turf.
Best Time to Dethatch — Cool-Season vs Warm-Season Grasses
| Feature | Pink Slime (Bacteria) | Green/Mustard Algae (Plant) |
|---|---|---|
| Type | Bacteria (Serratia marcescens) | Plant-like organism |
| Texture | Slimy, gelatinous film | Fuzzy, powdery, or slimy |
| Location | Skimmers, PVC pipes, shaded corners | Walls, floor, and sunlit areas |
| Treatment | Scrubbing and high chlorine shock | Algaecide + shock |
Weather conditions to avoid (heat, drought, overly wet turf)
Skip lawn dethatching during high heat or drought stress. The grass can’t repair itself efficiently, and you can end up with thin spots for weeks. Also avoid late-season work when growth is slowing down and there’s not enough recovery time left.
Aim for a day when the lawn is dry on top and the soil is not muddy. Dethatching wet turf tends to tear and clump instead of lifting thatch cleanly.
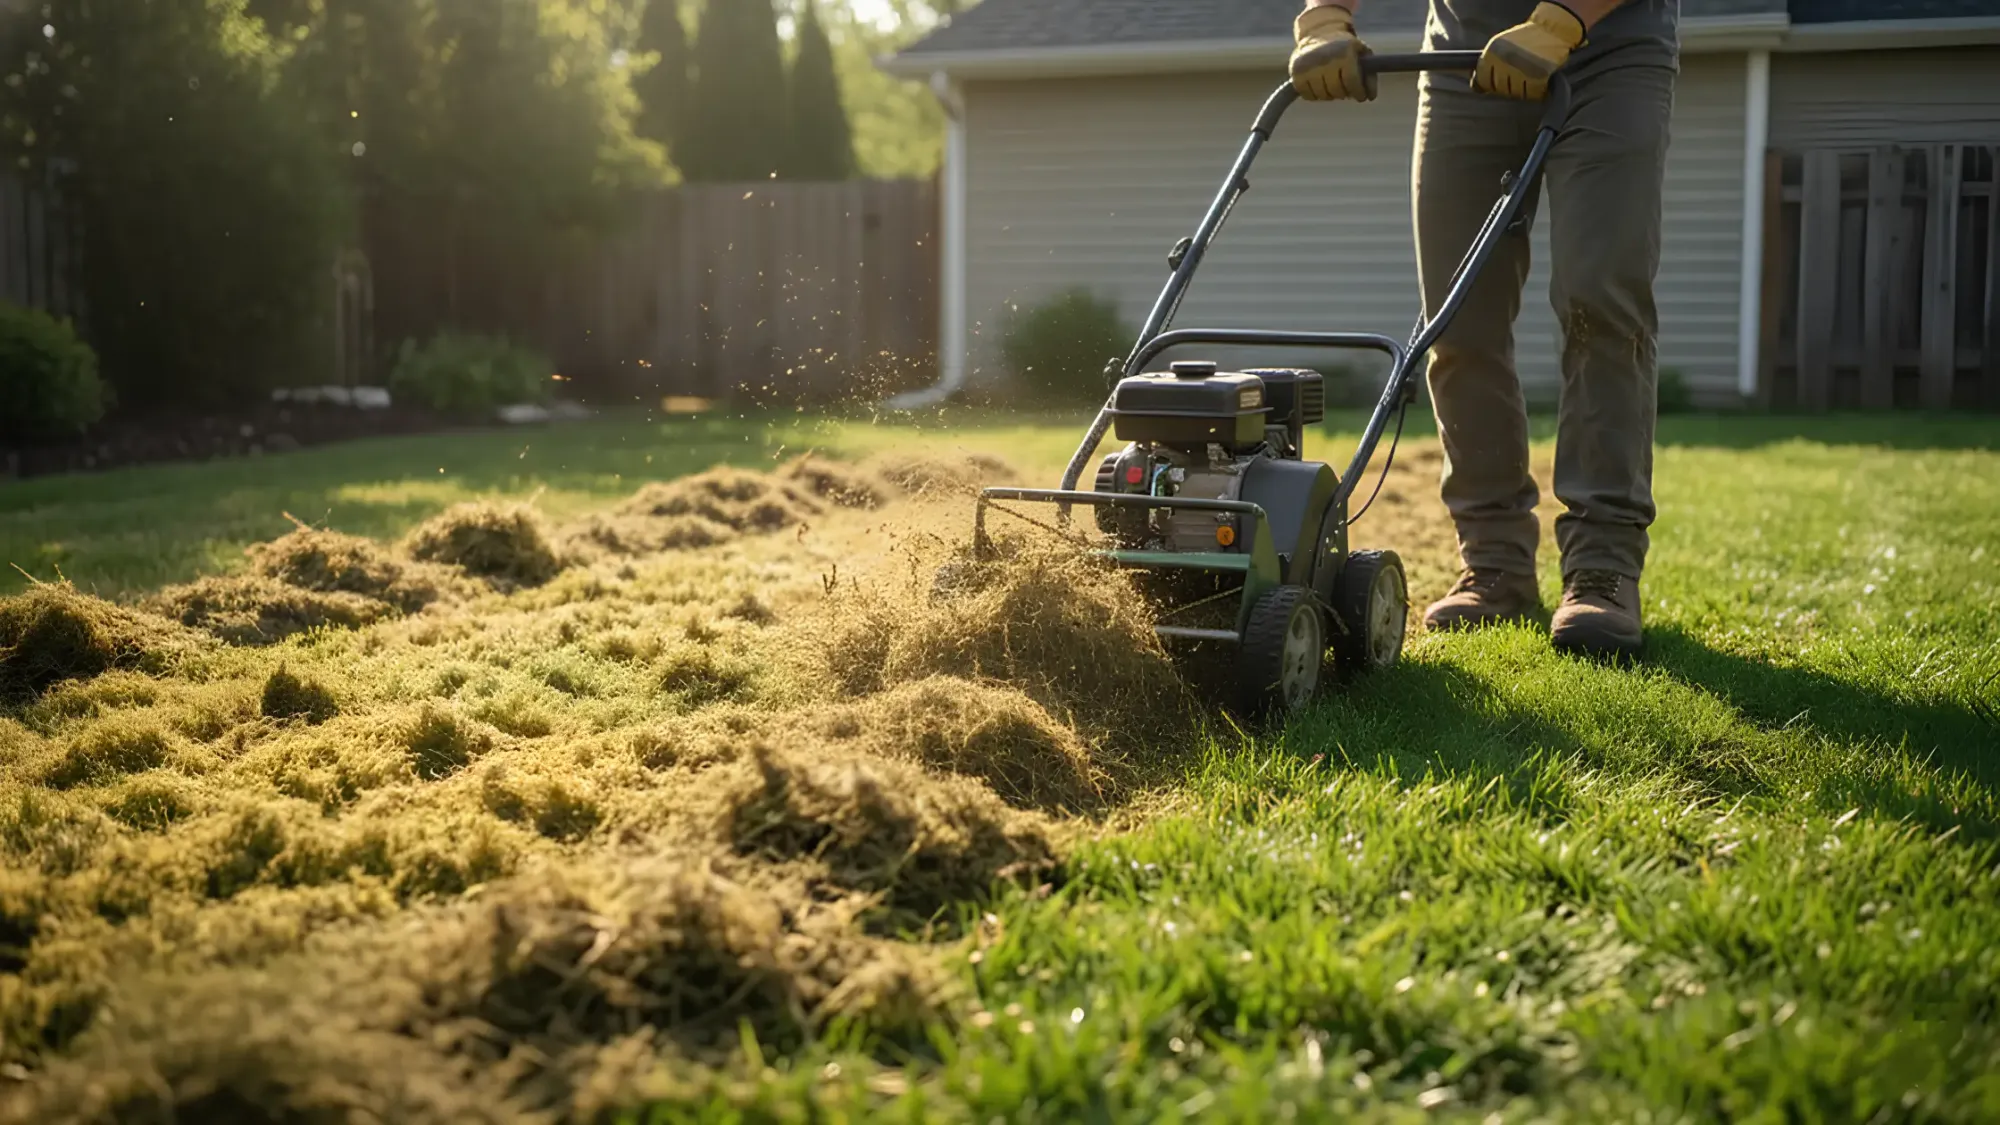
How to Dethatch a Lawn: A Step-by-Step Guide
Done right, how to dethatch a lawn is less about ripping everything up and more about pulling out the dead mat so air, water, and roots can reconnect with the soil. Expect the lawn to look rough afterward. That’s normal.
Prep: mow to half height; flag sprinkler heads
Start by mowing the lawn down to about half your normal mowing height. This opens the canopy so the dethatcher can reach the thatch layer instead of just grabbing green blades.
Next, flag sprinkler heads, valve boxes, shallow drip lines, invisible dog fences, and low-voltage wire. Dethatchers hook anything they can grab.
Make sure the grass is dry on top. Wet turf tears more easily, and cleanup becomes a clumpy mess.
Step 1: Choose your tool (what is a lawn dethatcher?)
A lawn dethatcher is a tool designed to lift and pull thatch to the surface using spring tines or blades. Most DIY homeowners end up choosing between three options:
A thatch rake (hand tool) is best for small areas, spot problems, and light thatch. It’s slow, but it’s controlled.
An electric dethatcher (corded or battery) is a solid choice for many average-size yards with light-to-moderate thatch. It’s easier to handle than rental gas equipment, and it’s harder to accidentally go nuclear on your turf.
A power rake / vertical mower (often gas and rental-grade) is the most aggressive option. It’s the right call for thick, widespread thatch—but it can thin a lawn fast if you run it too deep or make too many passes. Research-based turf guidance also emphasizes starting conservatively and adjusting based on what you see coming up.
Step 2: Two passes crisscross
Set the machine to a conservative depth for the first pass. You’re aiming to lift thatch, not carve trenches. A good sign you’re in the right range is a noticeable amount of brown debris coming up without leaving the soil surface heavily gouged.
Make the first pass in straight lines with a slight overlap, like you mow. Then make a second pass perpendicular to the first (a crisscross pattern). This pulls material from different angles and gives more even results.
Stop and look as you go. If the lawn starts looking chewed down to bare soil in large areas, raise the setting and back off. More aggressive isn’t better—it’s just slower recovery.
Step 3: Clean up (compost if you want)
After lawn dethatching, the yard will be covered with loosened debris. Rake it into windrows and remove it. Leaving it on top can smother the turf and block light.
If you compost, dethatching debris can go in the pile. It’s mostly organic material, and it breaks down well in an active compost setup. Penn State and UMN both note that dethatching produces heavy debris that should be removed, and composting/disposal is part of the job.
Once cleanup is done, don’t chase perfection with extra passes. The lawn needs recovery now.
Post-Dethatching Care: The Key to Recovery (Brand Feature)
After you finish how to dethatch a lawn, the turf is temporarily more exposed. Sun and wind dry the surface more quickly, and roots near the surface can lose moisture quickly. The goal for the next couple of weeks is steady recovery, not forced growth.
Overseeding + starter fertilizer basics
If your lawn is thin after dethatching, overseeding right away can help fill it back in. Dethatching opens the surface and improves seed-to-soil contact, which is a big deal for germination.
Starter fertilizer can help when you seed, but keep it measured. Too much nitrogen can push top growth when the lawn really needs stable rooting and consistent moisture. Follow the label rate for your grass type and the season.
Watering = the Recovery Guardian moment (consistently moist, not soggy)
Right after you remove thatch, water is about keeping stress low. Give the lawn a solid drink to prevent surface roots from drying out, then shift into a consistency-first routine.
If you overseeded, the top layer needs to stay evenly damp during germination. That usually means smaller, more frequent watering at first. Once seedlings are up and you can tug them without them pulling out, taper toward deeper, less frequent watering to build roots.
- Avoid the two extremes that cause most setbacks:
- Too little water dries out roots and new seedlings fast.
- Too much water creates runoff, puddles, and muddy spots that often come back thin.
Aiper IrriSense 2: smart watering that supports recovery (not dethatching)
This is where Aiper IrriSense 2 fits as the Recovery Guardian. It’s not a dethatching tool. It’s a smart irrigation system designed to help you keep watering consistent and controlled during the recovery window—especially when you’re trying to keep the surface evenly moist without overdoing it.
Aiper highlights features like EvenRain™ Technology (rainfall-style watering), Smart App Control, multi-zone irrigation, and a Weather-Sense Response System to help avoid unnecessary watering. It also positions the rainfall-style approach as gentler and aimed at reducing issues like soil erosion during watering.
Common Dethatching Mistakes to Avoid
The fastest way to turn lawn dethatching into a setback is to be too aggressive or do it when the grass can’t recover. Most “dethatching disasters” come from a few predictable mistakes.
Dethatching at the wrong time
Dethatch when the lawn is growing strong, not when it’s struggling. Heat and drought slow recovery and can leave you with thin spots for weeks. Extension guidance consistently warns against thatch removal under heat/drought stress and emphasizes timing it with active growth.
Also avoid dethatching right before a tough weather swing. A sudden hot spell after you open up the turf can dry the surface fast and stress roots that are already shaken up.
Going too deep or making too many passes
Depth and pass count are where homeowners usually overdo it. If you’re pulling up a lot of green material and exposing soil everywhere, you’re not just removing thatch—you’re removing living turf.
Start conservative. Make one pass and look at the results. If you’re getting mostly brown debris, you’re on track. If the lawn looks shredded, raise the setting and stop trying to “win” the job in one afternoon.
Skipping cleanup and skipping recovery watering
Leaving debris on the lawn can smother the grass you’re trying to save. Cleanup is part of the process, not an optional extra.
The other miss is watering like it’s business as usual. After dethatching, the surface dries faster and needs steadier moisture at first. Overwatering is a problem too. Runoff and puddles often turn into thin spots later.
Summary
A dethatching job goes well when you treat it like controlled maintenance, not lawn surgery. Confirm the thatch layer is actually the issue, choose the right tool for your yard, and make conservative passes to remove thatch without tearing out healthy turf.
The results don’t come from the machine alone. Cleanup prevents smothering, overseeding can help the lawn fill back in, and consistent watering supports roots during the “ugly phase” after lawn dethatching.
If you want to make recovery watering more consistent, Aiper IrriSense 2 is designed to help with precision scheduling and rainfall-style application as a post-dethatching “Recovery Guardian.”
FAQs
How often should you dethatch?
Don’t dethatch on a fixed calendar. Check the thatch layer and let that decide. If the layer is thin, leave it alone. If it’s building into a dense mat and getting over about 1/2 inch, dethatching becomes worthwhile.
Can you dethatch wet grass?
No. Dethatching wet turf tends to tear instead of lifting cleanly. It also clumps debris, makes cleanup harder, and can leave ruts or gouges—especially with heavier machines. Wait until the grass is dry on top and the soil is not muddy.
Dethatcher vs aerator: what’s the difference?
A dethatcher is for removing a thatch layer at the surface. An aerator relieves soil compaction by pulling plugs (or punching holes) so water and air move into the root zone.
If your main issue is a spongy mat and you can see thatch when you part the grass, start with dethatching. If the soil is hard and you can’t push a screwdriver into the ground easily, aeration may be the better first move (and it can also help with long-term thatch management).
Research-based sources (.edu)
- University of Minnesota Extension — “How to control thatch in your lawn”: https://extension.umn.edu/lawn-care/how-control-thatch-your-lawn
- Clemson University HGIC — “Controlling Thatch in Lawns”: https://hgic.clemson.edu/factsheet/controlling-thatch-in-lawns/
- Penn State Extension — “Managing Thatch in Lawns”: https://extension.psu.edu/managing-thatch-in-lawns