Easy DIY Irrigation System for Lawn: A No-Dig Guide That Actually Works
Want a green yard without the shovel work? Discover two easy methods for a DIY irrigation system for lawn—no trenches or PVC glue required.

A DIY irrigation system for lawn is the easiest way to keep grass green without wrecking your yard or your back. You do not need trenches. You do not need PVC pipes glued together like a high-school science project. And you definitely do not need to spend $3,000 on an underground system to water grass.
This guide shows two no-dig ways to do it. One is the classic hose-and-timer setup. The other is a cleaner, smarter wireless option that fixes the mess most DIY systems create. I have tried both. One made me trip over hoses weekly. The other felt like cheating (in a good way).
Why Choose an Above-Ground Irrigation System?
Underground sprinkler systems are effective, but they come with serious trade-offs. Installation usually means trenching, cutting into existing turf, and committing to a fixed layout that’s expensive to change later. For many homeowners, especially renters or those with established lawns, that approach creates more problems than it solves.
But there is another reason people switch to no-dig systems that no one talks about: the control. You can move sprinklers, change zones, and tweak schedules without calling anyone or pulling out tools. Underground systems feel serious. Above-ground systems feel forgiving.
Costs stay manageable, repairs are simpler, and you’re free to adapt the system as your lawn or garden changes over time.
Planning Your DIY Irrigation System for Lawn (Do Not Skip This)
This part feels boring. It is not. In my experience, skipping planning is how people end up with swampy patches and crispy corners.
Start with your water flow. Do the bucket test. Grab a 5-gallon bucket, turn on the spigot, and time how long it takes to fill. Then divide 300 by the seconds it took. That number tells you how many sprinklers you can run without killing pressure. Simple math. Huge difference.
If we talk about Zoning and we see Hydro-zoning sounds fancy, but it is just grouping areas that need similar water. Shady & Sunny grass together. Flower beds are separate. According to US EPA WaterSense proper zoning reduces runoff and overwatering. And overwatering is not harmless. It weakens roots and invites disease (which nobody wants).
Method 1: The Traditional Hose-End Setup
The first method how to install sprinkler system is the traditional Hose-end steup. This is the setup most people start with. I did too. It works. But it comes with quirks.
Step 1: Faucet Connection
Must use a brass splitter, two-way or four-way, not plastic. Plastic cracks when the weather turns weird. A splitter lets you run irrigation while still using the stopper for washing a car or filling a bucket.
And yes, battery timers you use here, but make sure they are outdoor-rated. Water and electronics are not friends.
Step 2: Strategic Hose Layout
Run hoses along fences, edges, or under mulch. Do not drag them straight across the lawn unless you enjoy tripping at night. I learned that lesson once. Once was enough.
Keep bends gentle so sharp kinks choke water flow and shorten hose life. This is boring advice, but it saves money.
Step 3: Sprinkler Placement
Use head-to-head coverage. Each sprinkler should reach the next one. If you see dry stripes after a week, your spacing is off. Adjust. Test again. Repeat.
Step 4: Adding Automation
Timers matter more than people think. Manual watering turns into “I forgot again” fast. Battery-powered timers solve that. Just replace batteries before they die. Dead batteries mean dead grass.
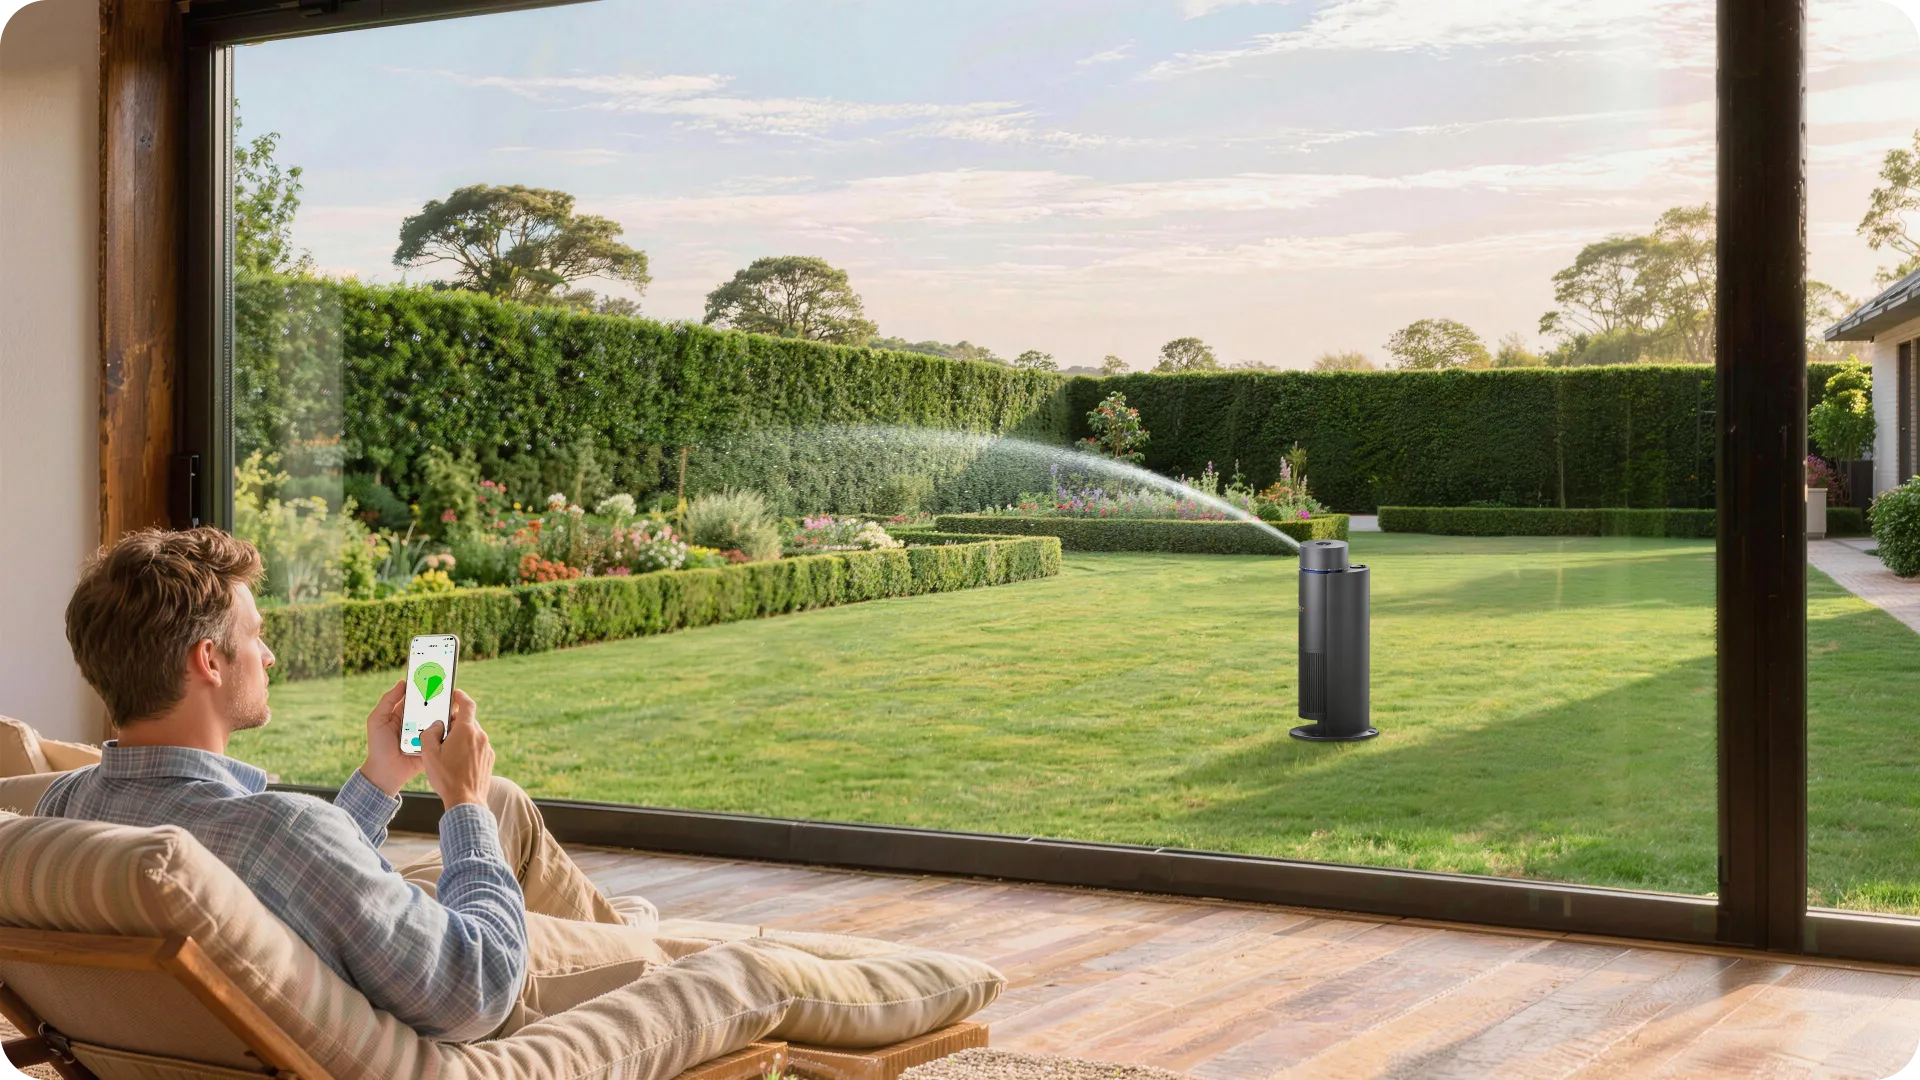
Method 2: The Smart Wireless Solution (Aiper IrriSense 2)
The biggest complaint about hose-based systems is clutter. Hoses can cross lawns, limit movement, and require frequent adjustments. This is where newer wireless systems change the experience.
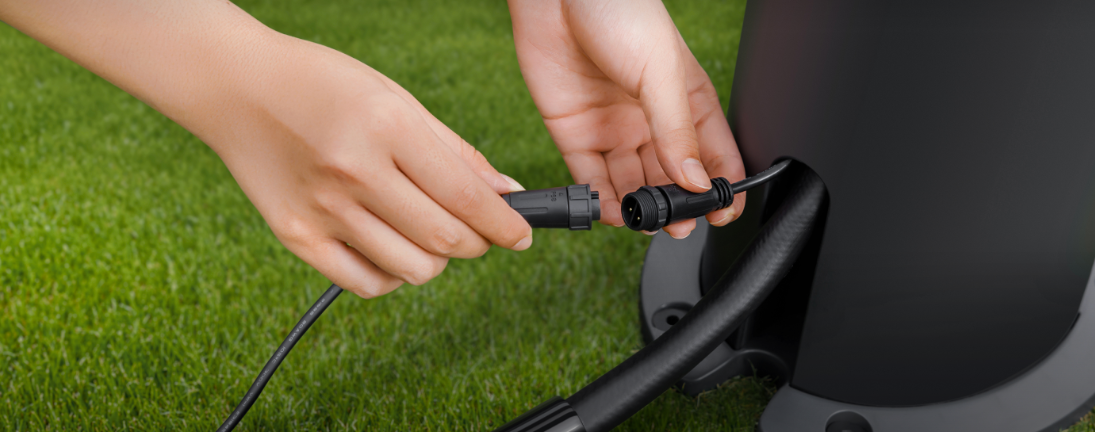
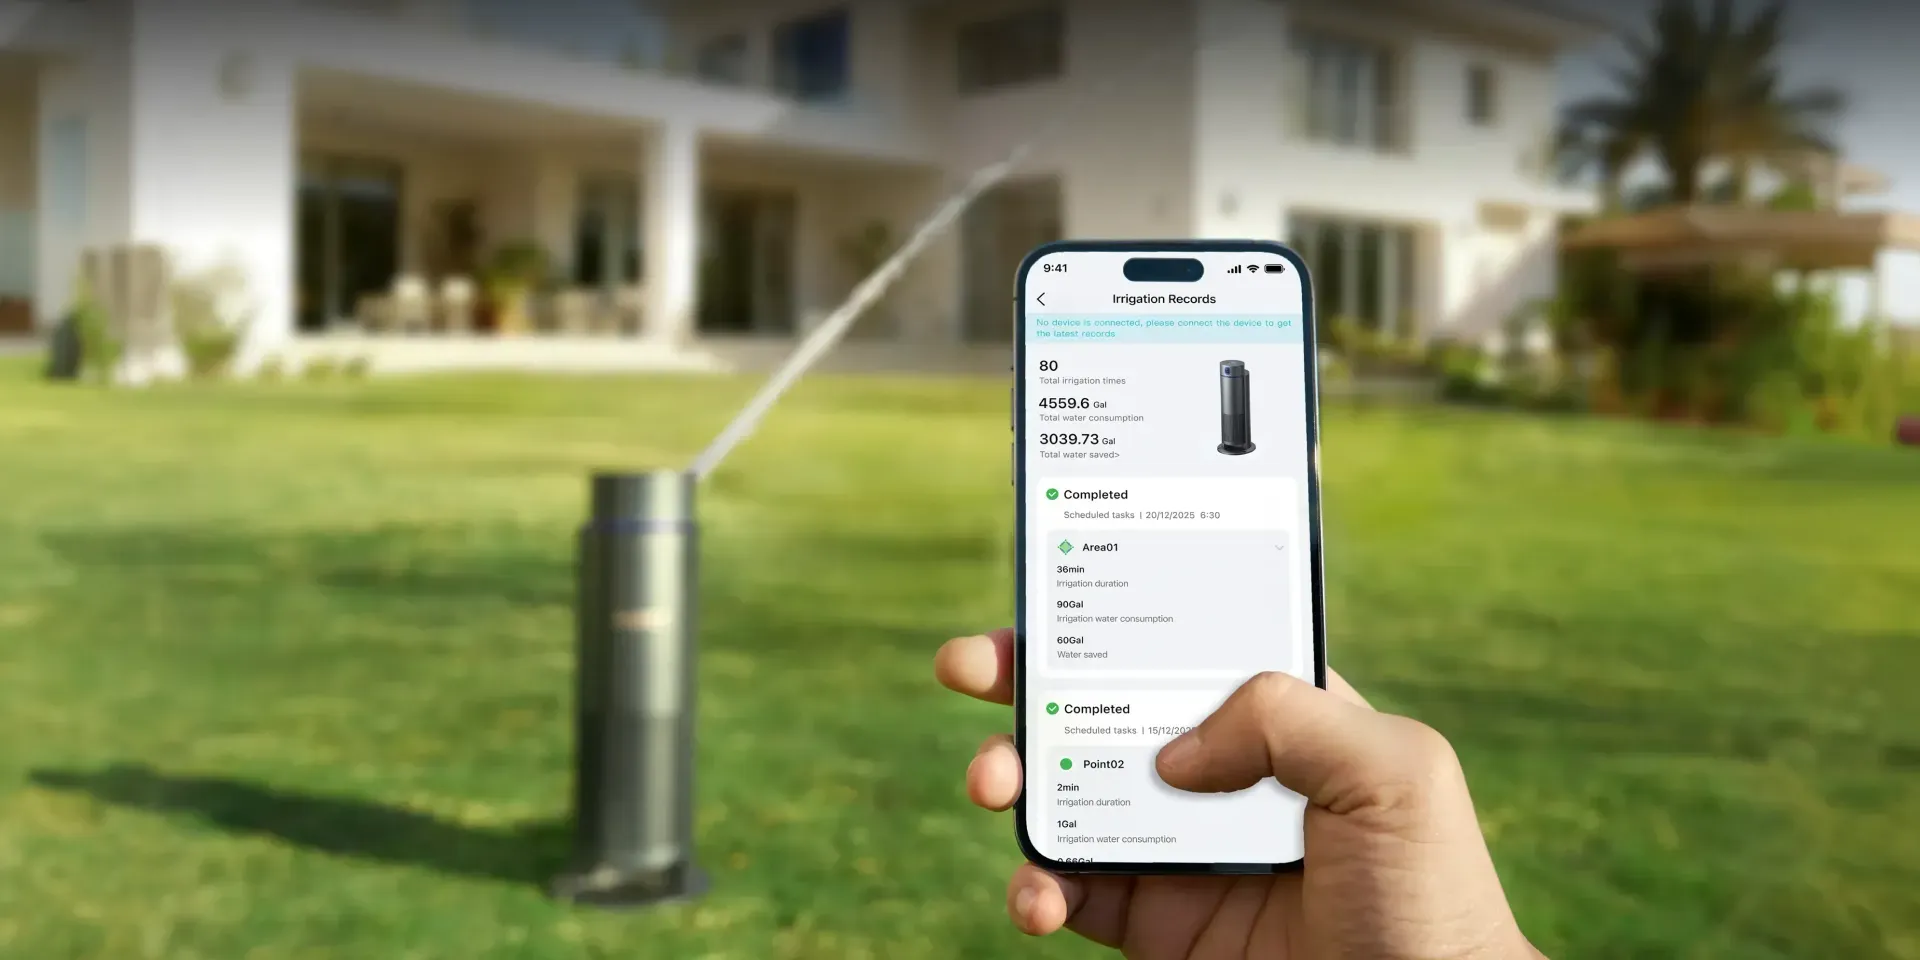
https://aiper.com/us/aiper-irrisense2 offers a clean, no-dig alternative that removes hoses from the lawn entirely. Each unit runs on long-lasting batteries and communicates through an app, allowing you to control schedules without standing at the faucet. Installation takes about 15 minutes and doesn’t involve tools or trenching.
Instead of building a web of hoses, you place units where water is needed, connect them, and set your schedule. The result is a neat lawn with fewer obstacles and more control over timing and coverage.
Quick Comparison: Underground PVC vs. Hose DIY vs. Smart Irrigation
| Grass Name | Drought Tolerance | Wear Tolerance | Maintenance Level |
|---|---|---|---|
| Buffalo | High | Medium–High | Low |
| Couch | High | Very High | Medium (requires regular mowing) |
| Kikuyu | Very High | Exceptional | Medium–High (vigorous growth) |
| Zoysia | Very High | High | Low (slow growing) |
| Fescue | Low–Medium | Low–Medium | Medium (requires more water) |
| Rye | Low | Medium–High | High (needs frequent feeding/watering) |
No system is perfect. But pretending that hoses aren't messy is lying to yourself.
Expert Tips to Get Your Sprinkler System Up and Running
Once your sprinkler system setup is complete, testing and fine-tuning matter more than the equipment itself. A system can look perfect and still water unevenly if timing and output aren’t checked.
University extension services recommend the Tuna Can Test to measure sprinkler output. Place several empty tuna cans around your lawn and run the system for 15 minutes. Measure the water depth in each can to see how evenly water is distributed. According to UC IPM, most lawns need about 1 to 1.5 inches of water per week, including rainfall.
If you live in a cold climate, remember to drain hoses, timers, or wireless units before freezing temperatures arrive. Proper shutdown prevents cracks and extends the life of your system.
Final Thoughts
A green lawn does not need trenches, glue, or a weekend ruined by digging. It needs consistency, smart planning, and a system you will actually keep using. If watering feels annoying, it gets skipped. Then the lawn suffers. Above-ground systems solve that problem by staying flexible and forgiving.
But if you want a cleaner yard with less clutter and easier control, the smart wireless route makes a lot of sense. That is where Aiper IrriSense 2 fits naturally. It removes hoses from the lawn, keeps scheduling simple, and avoids permanent changes to your yard.
The real win is this: you get healthy grass without heavy labor. No shovel. No regret. Just a setup that works with your life instead of against it.
FAQs
Can I install a DIY irrigation system for lawn on a slope?
Yes, and it works better than most people expect. The key is running shorter watering cycles so water has time to soak in instead of flowing downhill. In my experience, splitting watering into two short runs works far better than one long session on sloped lawns.
How do I measure water pressure at my outdoor spigot?
The easiest way is using a simple screw-on pressure gauge from any hardware store. Attach it directly to the faucet and turn the water on fully. Most residential systems perform best between 40 and 60 PSI, which keeps sprinklers consistent without stressing hoses or fittings.
Is Aiper IrriSense 2 difficult to install for beginners?
No, it is genuinely beginner-friendly. There is no digging, no wiring, and no tools involved. You place the units, connect through the app, and set your schedule. Even if technology usually annoys you, this setup feels straightforward rather than overwhelming.
How often should I run my sprinkler system during summer?
Most lawns do best with deep watering one to three times per week, depending on heat and soil type. Watering daily often leads to shallow roots and wasted water. The goal is fewer sessions, longer soak, and steady results over time.