How to Safely Winterize Your Sprinkler System: The Expert Guide to the Air Blowout Method

Every winter, thousands of homeowners wake up to a costly surprise — cracked pipes, damaged valves, and burst backflow preventers. The reason? Trapped water inside sprinkler lines expands by nearly 9% when it freezes, creating enormous pressure that splits plastic and metal alike. Once that happens, you’re looking at hundreds (sometimes thousands) in spring repair costs.
That’s why it’s so important to winterize your sprinkler system before the first freeze hits. Preparing your sprinkler system keeps it running smoothly year after year. In regions where temperatures drop below freezing, the Compressed Air Blowout Method remains the most reliable, professional-grade way to prevent freeze damage.
This guide walks you through every step of the expert blowout method, including essential safety gear, the right compressor specs, and precise operating pressure, so you can winterize like a pro or confidently supervise a contractor.
Why Traditional Draining Methods Fail
When temperatures drop below freezing, any leftover water in your irrigation system becomes a hidden threat. Water expands by about 9% when it freezes, creating intense hydraulic pressure inside your pipes. That pressure can easily crack PVC, split fittings, and ruin sprinkler heads, even if only a few tablespoons of water remain.
Many homeowners think draining their system manually or relying on “automatic drain” valves is enough. Unfortunately, most pipes aren’t perfectly level. Over time, they shift and form low spots where water collects and stays trapped. Those tiny pockets of water are all it takes for ice to form, expand, and wreak havoc on your sprinkler system.
Let’s break it down and compare the two approaches — Blowout vs. Manual Drain: Which Offers Better Protection and Reliability?
Blowout vs. Manual Drain: Climate Risk and Reliability
| Method | Climate Suitability & Reliability |
|---|---|
| Manual / Automatic Draining | Works only in mild climates with light frost. Relies on gravity to empty pipes, but as systems settle, low spots trap water. Even a small amount can expand up to 9% when frozen, creating pressure that cracks pipes and fittings. |
| Compressed Air Blowout | Required in freezing climates. Uses pressurized air to clear every drop, including from hidden low points. Provides complete, professional-grade protection and ensures your system is fully winterized for the cold season. |
Foundational Preparation Steps
Before touching the compressor, make sure your system is fully prepped. Skipping preparation can damage your equipment or make the blowout ineffective.
Step 1: Shut Off the Main Water Supply
Locate your irrigation system’s dedicated shut-off valve, found usually in your basement, garage, or an outdoor valve box near the main supply line. Turn the handle clockwise until it’s fully closed. This prevents more water from entering the irrigation lines during the process.
Step 2: Relieve Residual Line Pressure
Next, run one sprinkler zone for a few seconds or open a manual drain valve. This releases any trapped static pressure in the mainline and allows air to flow smoothly once connected.
Step 3: Manage the Controller and Electrical Isolation
Switch your sprinkler controller to “Off” or “Rain Mode.” Avoid unplugging the controller completely. Keeping it powered helps preserve your programming and prevents condensation or freezing in electrical components.
Step 4: Locate the Blowout Port and Backflow Preventer
Find the blowout port, which is typically a capped fitting near the main valve or backflow preventer. If your system lacks one, you’ll need to connect via the test cocks on the backflow preventer. Never attempt to push air through the backflow itself — that’s a recipe for damage.
How to Blow Out a Sprinkler System Safely
This step is where most homeowners hesitate, and for good reason as it can be potentially hazardous and should be done with extreme caution. Working with high-volume compressed air can damage pipes or cause injury if handled incorrectly. If you’re not completely comfortable using air pressure equipment, it’s strongly recommended to hire a professional. However, if you’re confident, experienced, and follow the safety guidelines carefully, you can perform the blowout safely on your own.
A. Critical Safety Protocol and PPE
Before you begin, gather proper safety gear. Mandatory equipment includes:
- ANSI-approved safety glasses or goggles
- Hearing protection (air compressors are loud)
- Gloves and long sleeves for added protection
- Keep all bystanders, especially children and pets, far from pressurized components
Never:
- Introduce air into a closed valve or line
- Stand over sprinkler heads or fittings while pressurized
- Point air tools toward yourself or others
Compressed air can cause severe injury if mishandled. Treat every part of the system as if it’s live.
B. Equipment Selection: PSI vs. CFM
One of the biggest misconceptions is that you need high pressure to clear a sprinkler line. In reality, volume (CFM) matters more than pressure (PSI).
Most residential sprinkler systems need a compressor capable of producing 20–50 CFM of air volume. Small home compressors often lack this capacity, which is why professionals use larger tow-behind or industrial units.
Pressure Regulation
Proper pressure control is critical when performing a compressed air blowout. Exceeding safe limits can damage sprinkler heads, fittings, or pipes, even if the pipe itself is rated for higher pressure. For routine winterization, never exceed 50 PSI, and always adjust pressure to protect the system’s weakest components.
| Pipe Material | Recommended Air Pressure (PSI) | Notes |
|---|---|---|
| Polyethylene (PE) | 30 – 50 PSI | Absolute maximum 50 PSI. Protects fittings and heads. |
| PVC | 50 PSI | Even if pipe rating is higher, this protects sprinkler heads and fittings. |
C. Step-by-Step Blowout Execution Sequence
Now, let’s go through the actual blowout process. Work slowly, follow the order, and never rush.
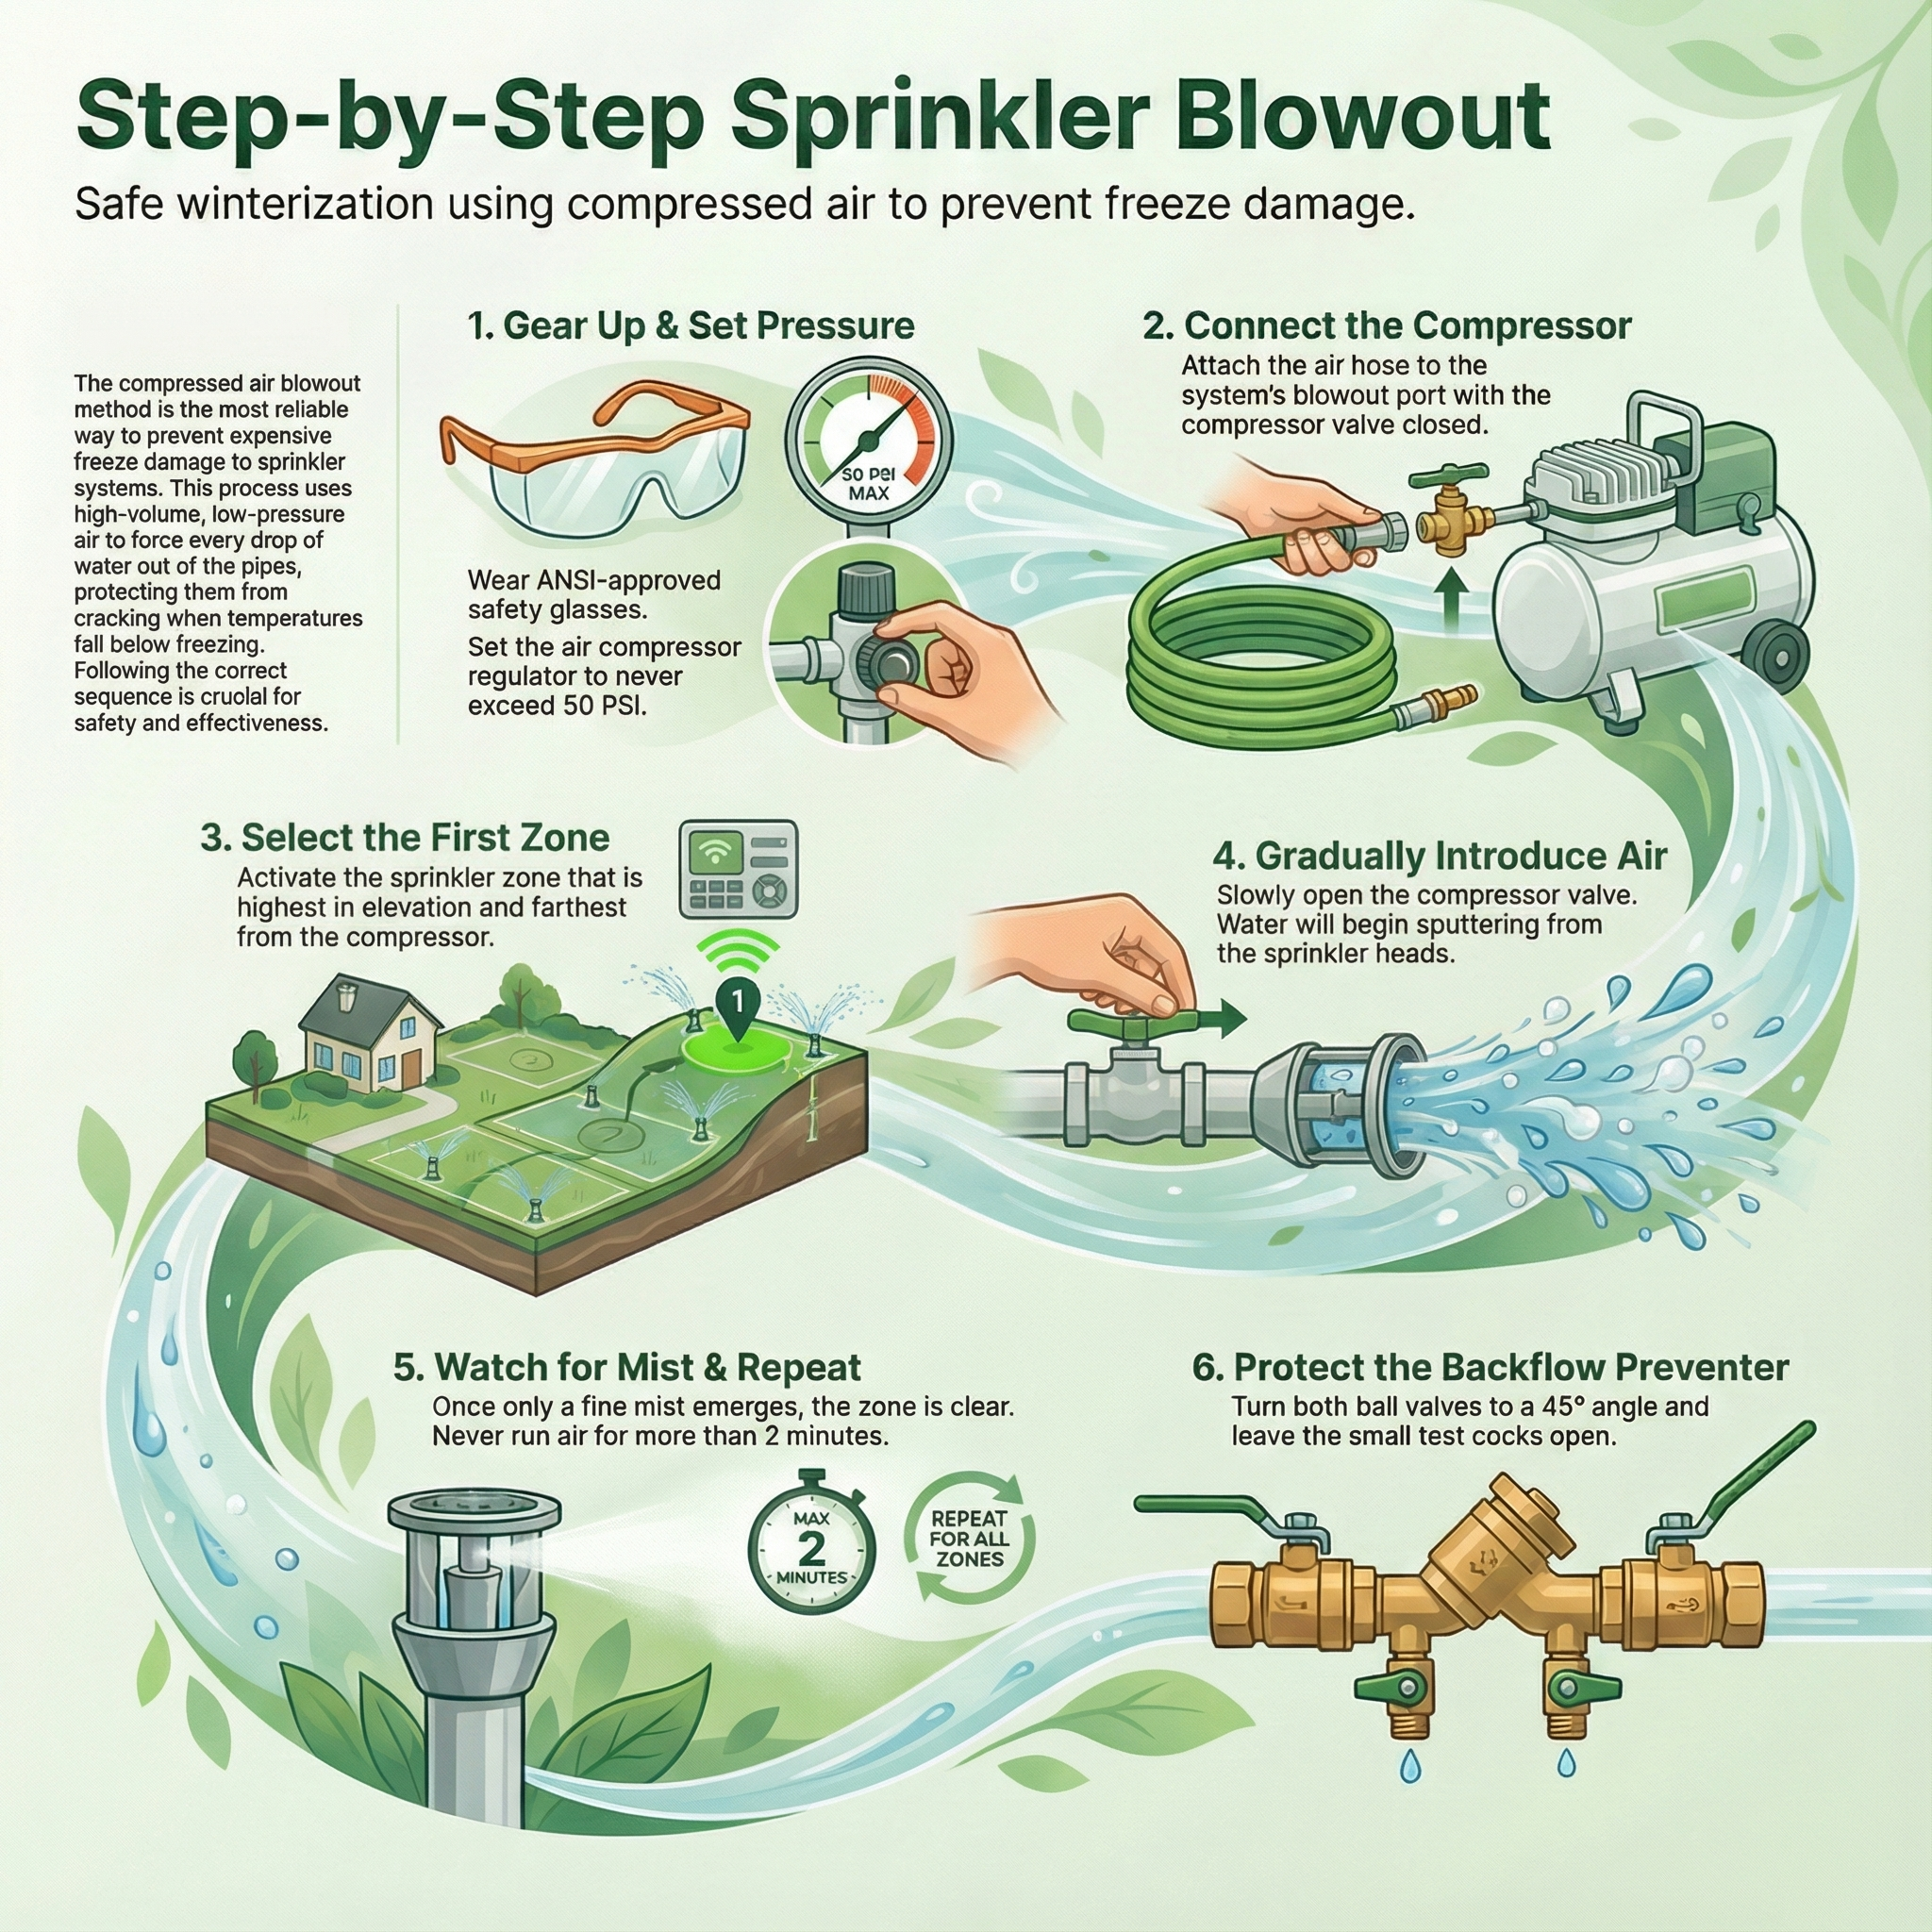
- Connect the Compressor:
Attach your air hose to the blowout port with the compressor valve closed and the regulator set to no more than 50 PSI.
- Start with the Highest, Farthest Zone:
Turn on the zone that sits highest in elevation and farthest from the compressor connection. This ensures that as air moves through, water is pushed downhill and out naturally.
- Gradually Introduce Air:
Open the compressor valve slowly. You should see water begin to sputter from the sprinkler heads, followed by mist, then vapor.
- Watch for the Mist Transition:
Once a fine mist replaces water, that zone is cleared.
Always follow the Two-Minute Rule: never run compressed air through a single zone for more than 2 minutes at a time. Extended air flow can generate heat and friction, which may damage valve diaphragms and seals. Move methodically from one zone to the next, applying the same process. By the time you reach the final zone, the system should be mostly clear of water, with only vapor remaining.
At this stage, your underground lines are dry and protected — but you’re not done yet.
Protecting the Backflow Prevention Device
Your backflow preventer (PVB or RPZ) is one of the most fragile and expensive parts of your sprinkler system. It’s also the first to crack if left unprotected.
Never force air directly through the backflow preventer. Instead, isolate it after the lines are cleared, then drain and protect it manually.
PVB (Pressure Vacuum Breaker) Winterization
Locate the two test cocks (small brass screws) on the PVB and open them slightly — about a quarter turn — to release residual pressure.
Turn both inlet and outlet ball valves to a 45° angle (halfway between open and closed). This halfway position is crucial. It prevents water trapped inside the valve cavity from freezing and cracking the brass body. Leave the test cocks open throughout winter.
Final Protection and Insulation
Once your system is fully drained and the PVB is isolated, start by removing any flow sensors if your system has them. Next, insulate all exposed components, focusing on the backflow preventer and control valves, using foam pipe covers, fiberglass wrap, or custom insulation bags. Be careful not to create airtight insulation; any trapped moisture needs a way to escape to prevent corrosion and long-term damage.
These last steps ensure your hard work pays off — no cracks, no leaks, no springtime surprises.
Smart Winterizing Made Easy
If you take one thing from this guide, it’s this: the Compressed Air Blowout Method is the only reliable way to winterize your sprinkler system in any freeze-prone region. Draining alone won’t cut it.
The key to success is three factors: sufficient air volume (CFM), strict pressure control (max 50 PSI), and setting backflow ball valves to a 45° angle.
If you’re tired of the annual hassle of hoses, compressors, and air regulators, consider upgrading to a smarter irrigation system. The Aiper IrriSense takes all the guesswork out of winterizing. It's one-click Winter Drain Mode automatically drains water from the lines and protects sensitive components — no compressor needed.
How to Winterize Your Aiper IrriSense
Step 1: Before the first hard frost, activate “Winter Drain” mode on the device or through the mobile app. The system automatically empties residual water.
Step 2: Shut off your water source, disconnect the garden hose, and store the main unit indoors, or cover it with a weatherproof enclosure.
Step 3: Unplug the power cord and ensure all ports are dry before storage.
That’s it. With Aiper IrriSense, you get precision irrigation all summer, and hands-free protection all winter.
Final Thoughts
Whether you prefer the hands-on satisfaction of a compressed air blowout or the convenience of a smart self-draining system, winterizing your sprinkler system is an essential step in protecting your investment.
Do it right once, and your sprinklers will reward you with years of trouble-free performance — season after season.
FAQs about Your Sprinkler System Winterization
Q: What is the best way to winterize a sprinkler system in cold climates?
A: The Compressed Air Blowout Method is the most effective and mandatory. It removes residual water from all low points, preventing freeze damage.
Q: Can I use my home air compressor to blow out the sprinkler system?
A: Most home compressors lack the necessary air volume (20 CFM minimum for residential lines). Insufficient CFM will not effectively push water out of the longest runs.
Q: What happens if I use too much PSI when I blow out the sprinkler system?
A: Excessive pressure (above 50 PSI) can instantly rupture delicate components like sprinkler heads and valve seals, causing costly damage to your system.
Q: When should I winterize my sprinkler system?
A: Winterization should be completed just before the first hard freeze is expected. For safety, finish the blowout procedure before ground temperatures consistently drop below 32°F.
Q: Can I just drain the water manually?
A: Manual draining is unreliable in freezing climates because water is left trapped in low points of the buried pipes. This residual water will freeze and split the pipe.